Welcome
As lift professionals, ensuring accuracy in lift measurements is paramount to the success and safety of our projects. However, encountering inaccuracies or missing measurements in enquiries is not uncommon. This often stems from confusion over which elements to measure.
In this article, we will highlight three dumbwaiter measurement tips that lift professionals must be aware of when sourcing a new dumbwaiter lift, addressing common misconceptions and clarifying each aspect.
What’s the issue?
Firstly, we’d like to explore the elements which may confuse some lift professionals. We believe it’s down to subtle differences between measuring for a dumbwaiter service lift and a passenger or platform lift.
Floor-to-Floor Measurement
The floor-to-floor measurement is the distance between floors, a fundamental aspect of lift installation. For passenger lifts, this measurement is typically from sill to sill.

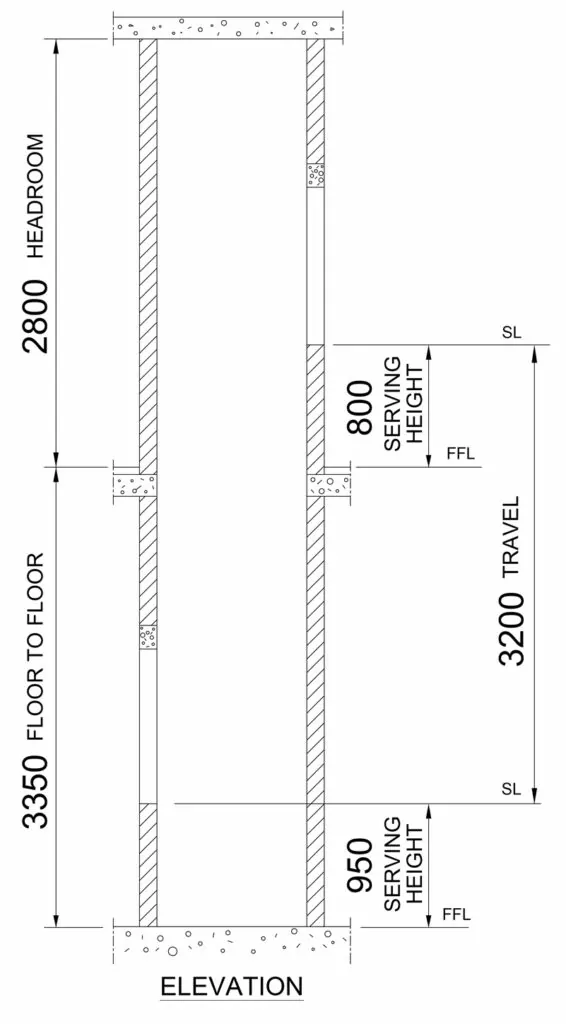
However, when dealing with dumbwaiters equipped with waist-level loading, it’s crucial to account for any difference in serving height on the lowest floor compared to the additional floors. Failing to do so can lead to improper alignment, as the floor-to-floor distance does not always equal travel, as shown in our example below.

As you can see, the floor-to-floor in this example is 3350mm. However, due to the 150mm difference in serving heights, the travel is only 3200mm.
Headroom Measurement
Headroom measurement is often misunderstood, leading to potential errors in lift installations. Contrary to popular belief, headroom does not solely refer to the space above the lift car on the top finished floor. Instead, it should be measured from floor to ceiling in a single, comprehensive measurement. Dividing the measurement into segments, such as floor to sill, sill to the top of the car, and top of the car to ceiling, increases the likelihood of inaccuracies. Adopting the correct method minimises the risk of errors and ensures accurate space for mechanical and electrical components within the headroom space.
Accessible Space
Although not strictly an area that needs a specific measurement, identifying accessible space is a vital element of any site measurement visit. Accessible space is any area beneath the lift, such as a cellar or another floor. When Accessible Space is present, safety gear must be incorporated into the dumbwaiter to comply with EN81-3.
In conclusion, mastering essential lift measurements is crucial for lift professionals to execute successful installations and ensure safety and functionality. By understanding and accurately measuring floor-to-floor distance, headroom, and accessible space, professionals can mitigate risks, avoid errors, and deliver superior lift solutions. Let’s strive for precision in our measurements to uphold the highest standards of excellence in lift installations.
Harness specialist new lift knowledge.
Thank you for reading our blog our three dumbwaiter measurement tips for lift professionals. We hope that the information provided has been helpful and informative.
If you have any further questions or need assistance with a dumbwaiter lift specification, please don’t hesitate to contact us. Our team of experts is always ready to support you in your lift maintenance endeavours.


